
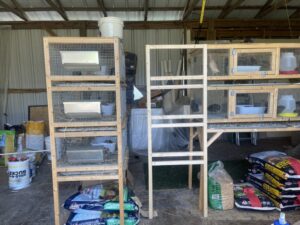
Quail Cage Build Made Easy
Quail cage build made easy with step-by-step instructions and demonstration. Material list and cut list included!
Equipment
- hand drill
- 1/8" bit (for pre-holes)
- table saw
- clamp, medium size
- wood clue
Materials
- 14 2" x 2" pine boards
- 5 1" x 2" pine boards
- 1 2' x 3' plywood (for roof)
- 24" wide 1/2" hardware cloth (19 gauge)
- 3 36" oil trays
- 6 2" hinges
- 3 2" latches
Video
Notes
 Cut List
Out of the 2" x 2" boards, cut:
Cut List
Out of the 2" x 2" boards, cut:
- 4 - 70" boards
- 15 - 21" boards
- 14 - 36 1/2" boards
- 3 - 10 1/2" boards
- 9 - 19 1/2" boards
- 6 - 36" boards
- Place a little glue on both ends of a 21" board and clamp to one end of the 70" board. Pre-drill stater hole for your convenience and then attac with the screw.
- Attach a 70" board to the other end of the 21" board o create the top level (roof edge) of the cage.
- Measure down 12" from the top on both 70" boards and mark. Add glue to both ends of 21" board and screw into place.
- Go down 15-1/2" from the top on both 70" boards and mark. Add glue to both ends of 21" board and screw into place. We will continue this process with the following measurements as follows.
- 27-1/2" from the top, glue, screw into place.
- 31" from the top, glue, screw into place.
- 43" from the top, glue, screw into place.
- And lastly, 46-1/2" from the top, glue, screw 21" board into place. It whould look like the image above.
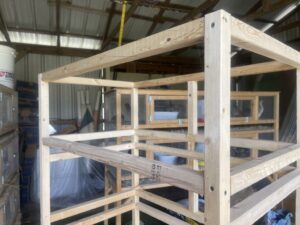 Step 2: join the sides
First, we ONLY join the backside of the quail cage. You will need 7-36 1/2" boards.
Step 2: join the sides
First, we ONLY join the backside of the quail cage. You will need 7-36 1/2" boards.
- Join the 2 sides together at the top.
- Aligh a 36 1/2" board with the 21" board that created the side.
- Take 2 - 36 1/2" boards and place a mark at 17 1/2"
- Join the 10 1/2" board at the 17 1/2" mark on both 36 1/2" boards. Always glueing both ends and then screwing into place.
 Step 4: front assembly
- Attach one of the quail cage frames you just made to the sides beginning at the top.
- Continue this process for the other two cage fronts.
- Place a 36 1/2" board along the bottom, aligned with the 21" side board. This is for your bottom tray.
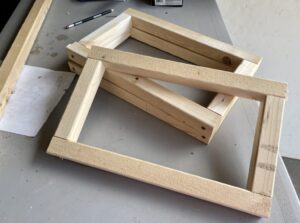 Step 5: the doors
- Measure the opening where you want the door to be hung.
- Subtract 1/4" to 3/8" from the horizontal measurement and cut 2 pieces.
- For the vertical pieces we will need to subtract the width of the horizontal pieces as well. Therefore, take your vertical measurements and subtract 3 1/4" and cut 2 boards to that size.
- Join together with wood glue and screws.
- Cover with harward cloth.
 Step 6: removable floor
Here we will go through the same process as the doors except we'll be measuring the inside where the floor will go AND we will be using 1" x 2" boards instead of the 2" x 2" boards.
Step 6: removable floor
Here we will go through the same process as the doors except we'll be measuring the inside where the floor will go AND we will be using 1" x 2" boards instead of the 2" x 2" boards.
- Measure horizontally the inside opening where the floor will go and subtract 1/4" from the horizontal measurement. Cut 3 sticks of wood (1 for center to add stability).
- Now measure the vertical width, subtract 2-1/4" from the measurement and cut 2 sticks of wood.
- Join together with wood glue and screws.
- Cover with hardware cloth.
- Screw through outer 2" x 2" board into the 1" x 2" board to hold into place.
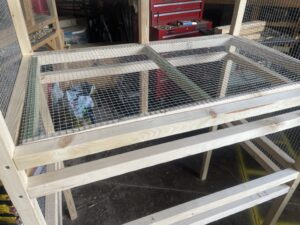
- Hang the door on the fron and then add hardward cloth to the fron opening only. DO NOT cover the opening where the tray will go.
- Nail or screw the 2' x 3' sheet of plywood to the top of the quail cage for the roof.
- Add trays.