
Quail cage build made easy with step-by-step instructions and demonstration. Material list and cut list included!
Materials List:
- 14 – 2″ x 2″ pine boards
- 5 – 1″ x 2″ pine boards 2′ x 3′ plywood (for roof)
- 2-1/2″ screws
- 24″ wide 1/2″ hardware cloth – 19 gauge
- 3 – 36″ oil trays (I get mine from Auto Zone or Advanced Auto. $10 to $11 ea.)
- 6 – 2″ hinges
- 3 – 2″ latches
Tools You’ll Need:
- hand drill
- 1/8″ bit (for pre-holes)
- table saw
- clamp
- wood glue

To begin building the quail cage, let’s get all of our boards cut and ready for assembly.
Cut List:
Out of the 2″ x 2″ boards, cut:
- 4 – 70″ boards
- 15 – 21″ boards
- 14 – 36 1/2″ boards
- 3 – 10 1/2″ boards
Out of the 1″ x 2″ boards, cut:
- 9 – 19 1/2″ boards
- 6 – 36″ boards
Step 1: quail cage sides
Now I love a clamp so get yours ready. We will only be using 2″ x 2″ boards in this first part of the build so put your 1″ x 2″ boards aside for now.
- Place a little glue on both ends of a 21″ board and clamp to one end of the 70″ board. Pre-drill starter hole for your convenience and then attach with the screw.
- Attach a 70″ board to the other end of the 21″ board to create the top level (roof edge) of the cage.
- Measure down 12″ from the top on both 70″ boards and mark. Add glue to both ends of 21″ board and screw into place.
- Go down 15-1/2″ from the top on both 70″ boards and mark. Add glue to both ends of 21″ board and screw into place. We will continue this process with the following measurements as follows.
- 27-1/2″ from the top, glue, screw into place.
- 31″ from the top, glue, screw into place.
- 43″ from the top, glue, screw into place.
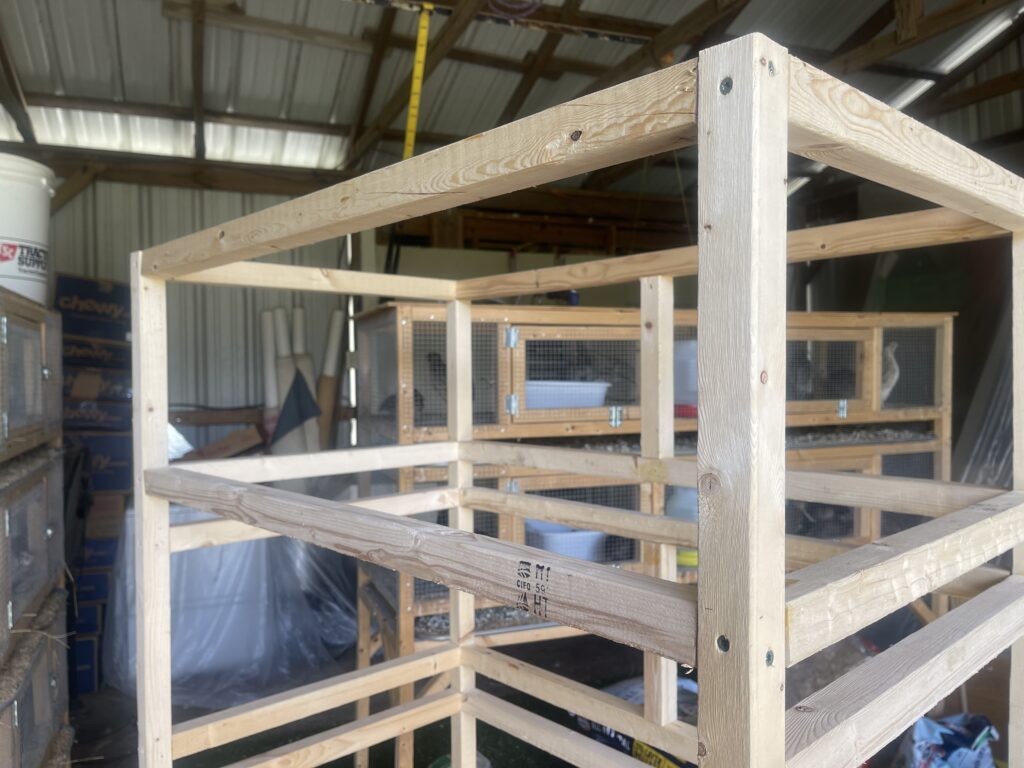
- And lastly, 46-1/2″ from the top, glue, screw 21″ board into place. It should look like the image above.
You have completed one side of your quail cage. Congratulations! You are well on your way. Now repeat this process for the other side.
Step 2: how to join the sides
First, we will ONLY join the backside of the quail cage together. You will need 7 – 36 1/2″ boards.
- Join the 2 sides together at the top.
- Align a 36 1/2″ board with the 21″ board that created the side. See photo above.
- Continue this process all the way down wherever there is a 21″ board on the side.
Step 3: how to build the front
- Take 2 – 36 1/2″ boards and place a mark at 17 1/2″.
- Join the 10 1/2″ board at the 17 1/2″ mark on both 36 1/2″ boards. Always glueing both ends and then screwing into place.
You have just framed out the front of one of your quail cages. Now repeat this process for the other two cages.

This post may contain affiliate links. We make a small commission if you buy the products from these links (at no extra cost to you). As an Amazon Associate, I earn from qualifying purchases. But I only recommend products we would use ourselves.
Step 4: front assembly
- Attach one of the quail cage frames you just made to the sides beginning at the top.
- Continue this process for the other two cage fronts.
- Place a 36 1/2″ board along bottom, aligned with 21′ side board. This is for your bottom tray.
Step 5: it’s time to build the doors
- Measure the opening where you want the door to be hung.
- Subtract 1/4″ to 3/8″ from the horizontal measurement and cut 2 pieces.
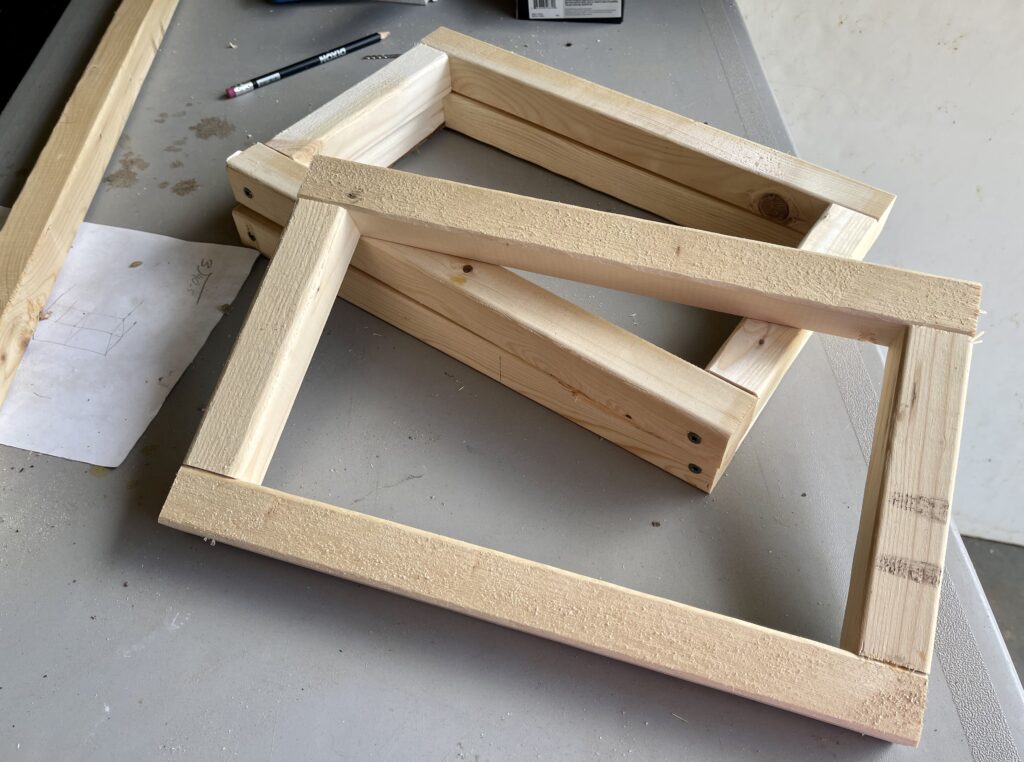
- For the vertical pieces we will need to subtract the width of the horizontal pieces as well. Therefore, take you vertical measurements and subtract 3-1/4″ and cut 2 boards to that size.
- Join together as shown above with wood glue and screws.
- Cover with hardware cloth.
Repeat this process for the remaining two doors making adjustments in size when needed. Sometimes it takes a little tweaking. At least for me anyway.

For the floor we will use the 1″ x 2″ boards.
Step 6: quail cage removable floor
Here we will go through the same process as the doors except we’ll be measuring the inside where the floor will go AND we will be using 1″ x 2″ boards instead of the 2″ x 2″.
- Measure horizontally the inside opening where the floor will go and subtract 1/4″ from the horizontal measurement. Cut 3 sticks of wood (1 for center to add stability).
- Now measure the vertical width, subtract 3-1/4″ from the measurement and cut 2 sticks of wood.
- Join together with wood glue and screws.
Here you can use smaller screws if you want or need to because the boards are thinner. Place inside floor area and test for size. You may need to trim a tad but not a problem! I hate having to take something apart and redo but sometimes you just have to. So take it apart and give it a little trim. The glue hasn’t had time to set and you’ll be so glad you did when it comes time to remove the quail cage floors for cleaning.
- Cover with hardware cloth.
- Screw through outer 2″ x 2″ board into the 1″ x 2″ board to hold into place.
Repeat this process for the other two floors.
Step 7: the finishing touches
Now it’s time to hang the doors and add the hardware cloth.
- Staple hardware cloth to both ends and the back. It’s okay to cover the tray slot on these areas if you like or you can measure and cut cloth to fit the cage opening only. It’s your choice.
- Hang the door on the front and then add hardware cloth to the front opening only. DO NOT cover the opening where the tray will go.
- Nail or screw the 2′ x 3′ sheet of plywood to the top of the quail cage for the roof.
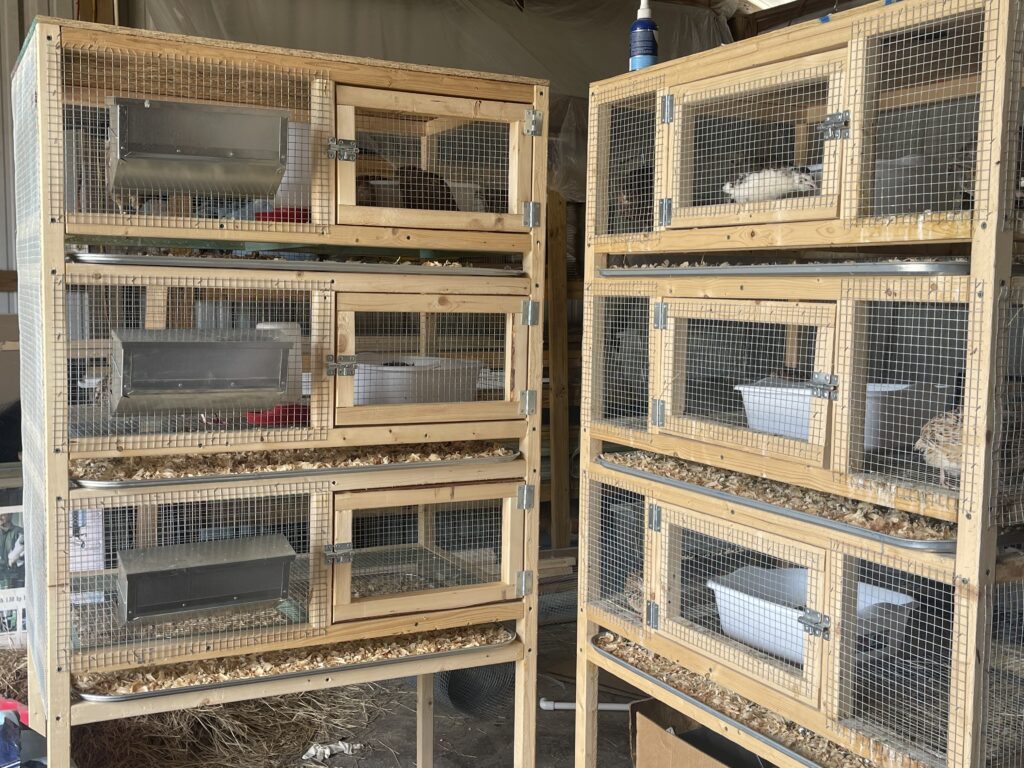
- Add trays
Your quail cage is ready for it’s new inhabitants.

How to Video Links Below for Raising Quail:
- Quail Cage Feeder Install
- How to Lessen the Waste
- DIY Automatic Waterer
- Automatic Waterer Upgrade
- Don’t Let the Flies Overtake your Quail
- Male or Female?
- All of These Quail Eggs!
- Quail Cage Clean Up Made Easy
- Learn to Harvest & Butcher Quail
- Quail for Supper
Find More Homesteading Links Below:
- How to Make the Best Sourdough Bagels
- How to Build the Best Tomato Trellis
- How to Homestead with Only an Acre of Land
- About Us
- How to Grow an Amazing Corn Crop this Year
If you ever have any questions, please don’t hesitate to ask. I love to hear from you!
Happy Homesteading!
Marian
If you ever have any questions or comments, please don’t hesitate to ask. We love to hear from you!
Happy Homesteading!
Marian
What did you end up using for waterers? Do you have a link ? THANKS!!
On one of my pens I have an automatic waterer that I will be creating a video/blog post on soon. But the other pens I use regular chicken waterers in their cages for now just because I haven’t gotten around to building the automatic ones yet.
Thank you so much for checking out my blog!
Hi Ken,
Just wanted to update you and provide you with a link to my new video “DIY Automatic Waterer”. You can just follow this link here: https://youtu.be/_sunyBpQkJw
Please let me know if you have any questions. I hope this helps!
Best wishes,
Marian
Going back through some of the comments and wanted to share a link to building an automatic waterer for your quail. Hope you enjoy: https://www.youtube.com/watch?v=cni6V77sGbY&t=35s
Where did you get your feeders that hang on the outside of pen? Also, do you keep your pens under cover or outside? Thx
Here is a link to the feeders: https://www.strombergschickens.com/product/9-5-econo-feeder-with-lid
I keep my cages inside a garage right now but a shed or such would work too. You could extend the roof on the cages which would make them work for outside too but I’d paint the boards to keep them rotting. Also, place the legs on concrete or pavers to keep them off of the ground.
I hope that helps and the best of luck to you.
Hi! It looks like the link to the automatic water feeders aren’t working properly on YouTube. Can you please help? Thank you!
Perhaps there was something going on with Amazon that blocked them, I just don’t know. But I did test them and they took me to the products. I’ve included them below for your convenience. If you have any more issues please let me know. I’m so sorry for the inconvenience.
HELPFUL LINKS:
Poultry Nipples: https://amzn.to/3ApEutH
3/8″ Brad Point Bit: https://amzn.to/2YEE4mg
teflon tape: https://amzn.to/2YzTpnM
These links are affiliate links which means that we receive a small commission that helps our channel. Thank you so much for joining us!
Happy Homesteading,
Marian
is the materisl list provided for one three section quail cage or is that for two, I just started raising quail a few weeks agobought some pearls and waiting for them to mature. I have tried looking at different plans and out of all of them, i like yours the best but my quail will be staying out side i live in town but have a good size yard, great work and keep it up
The material list is for one 3-level cage. With them staying outside, be sure to extend the roof to give them cover in the rain and place them somewhere to protect them from too much wind if you can. They love the outdoors but no need a little protection. Best of luck in your journey and let me know if you have any further questions. I’m glad to help and thank you so much for checking out the blog. We also have a YouTube Channel, Simply Made Homestead, with lots and lots of things in regard to raising quail. Thanks again!
I was going to use your plans but at one end i was going to make a box and connect it to the cage so the quail will have a place to go during rain and high winds, since these will out side should i use straw or pine shavings in the box to help them and do you place anything inside for a dust bath, I have the pearls now but boy do they kick the sand everywhere along with straw.
Thank you
I was going to ask do you cull any of your quail i have 12 now bught them as a straight run but I think all are male i have a few crowing but i am not getting any eggs and they should be 8-10 weeks old, i try to ID the males from females but they ase hard to handle at times.
I do cull my extra males and females that don’t make the cut (size, color, traits). And at 8 weeks they can still be hard to sex. We have a YouTube channel full of videos on raising quail with “how to sex”, “how to butcher”, etc. There is lots of good information that could help a bunch. Here’s the link here: https://youtube.com/playlist?list=PLAs5iHYl7ol9kzHmiprKlB8_hnYZGGK8b
Let me know if you any other questions. I’m here to help!
I think that’s an excellent idea and you can use shavings or hay with a solid bottom. If you use wire, hay would be better. Make sure you can get to it easily for clean up.
As for their sand bath, I’ve used builders sand before, but currently we will on a sandy piece of property so we just use sand from the yard. A little diatomaceous earth and wood ash are really good additives to help fight against mites. But it only needs a little. Birds have very sensitive respiratory systems but quail are much tougher than chickens. They’re awesome!
I had a question, I put straw in my quail box where the quail can get out of the bad weather that is where most of them go at night why would they keep kicking the straw out. I would put new straw in several times a week when i clean the pen and by the end of the day it is in their pan they have pushed through the 1/2 inch wardware cloth for the bottom.
Great cages! I’d love to use the plan for our new flock. Can you confirm the length of the boards used to get the cuts outlined? Thank you!!!
Yes, the measurements are accurate.
What do you use for the removable tray?
I use drip pans purchased from Auto Zone and Advanced Auto. At the time of purchase they were $11 each. Here are some links that should help: Advanced Auto: https://shop.advanceautoparts.com/p/flotool-galvanized-drip-tray-11430mi/9016759-P?searchTerm=drip%20tray; Auto Zone: https://www.autozone.com/shop-and-garage-tools/oil-drain-pan/surebilt-large-drip-tray/475418_0_0
Do you put the hardware cloth on the top of the boxes (under the trays) or do they act as the roof?
No hardware cloth under trays. Trays do the job for us.
Looks like you copied another cage builders plan. https://youtu.be/w5VGuEQHXGY
Why yes I did! I watched several videos, built the cage that I preferred, and then made a video when I built my second cage to share with others. Never claimed that the plan was an original. Just shared the process in hopes of simplifying it and making it super easy for others that might like to do the same.
I watched his video and prefer yours.Thanks for making it! I just build mine and have 4 young kids so I’ve worked slowly on it for 2 days. Very simple to follow and easy to come back to. Looking forward to checking out your automatic waterer build! They will be outside bear our chicken coop i will do a tarp for drafts and snow. Any other suggestions to help with drafts and sbow? Thanks!
I would use tin for the roof and make it slanted. Just a slight elevation on one side to help the snow slide off. Also, be sure extend the roof some to give them extra coverage. With them living outside, if you could extend it 8 to 12 inches that would be great.
So glad to have you along and the best of luck with your quail.
Hi about how many quail do you put in each level?
I put 1 male to 5 females.
I have the frame built. Next comes the wire and doors. Thank you very much for the exact measurements on the cut list. That made the built go so much faster! One caveat for future builders. DO NOT SKIP STEP #3. I was on a roll and glued and screwed all the 36-1/2″ pieces to the front and back. OOPS! I had to use pocket holes to get the center upright in. Another fix would have been metal strips with screw holes. It would have been so much easier if I had followed the instructions.
I’m glad you’ve enjoyed it and it’s help you in your endeavor. Best of luck with your quail and thank you so much for your very kind comment.
Hi! I am looking to build my own quail cages. I would like to have about 60 quails for eggs for our own family as well as to share with other family. I am wondering how smelly the wood gets with this type of cage? How to get it clean if it can’t be power washed? I plan on having my setup in the garage and I’m worried it will be too smelly if the wood absorbs odors. Please share your experience! Thank you.
60 quail will provide you with about 50 eggs a day. 3 quail eggs = 1 chicken, as for amount of egg to consume. My three tier quail design holds 18 quail so you’ll need to have 4 cages or 2 long cages (twice the size of the design) in order to house 60 quail.
As for the smell, if you change out the shavings in the tray every few days, the smell will be minimal. The temperature in your garage will determine how often they will need to be changed.
As for cleaning the quail cage itself, It will need a deep cleaning every 6 months for the health of your birds. Moving it outside and cleaning with a pressure washer is by far the easiest and the deepest clean you can get, but if that’s not available for you there is another way. Just takes a little elbow grease.
Once the quail have been moved out of the cage, let the cage sit with a fan on it to help dry up the poop. Then take a scrapper and scrap all of the poop off of the wood and hardware cloth. After the poop has been removed, spray everything with a natural cleaner (no chemicals). A few drops of a citrus essential oil in water works great. Spray everything down well and you can let it dry or you take a damp cloth and wipe down any areas that need a little extra attention. Don’t use vinegar if you’re using this method. Any left on the hardware cloth will make it rust.
I hope this helps. Best of luck to you in your journey of raising quail. They really are easy to raise and a funny little bird to watch with some really enjoyable sounds. Have fun!
If you enjoy the quail cage design, I’d love it if you could leave it 5 stars. Thank you!
Hello
Great job on your build and your plans are spot on. I have also watched many videos and while your plans are a lot like others your detail of your build is very helpful. Thank you!
I do have a question on the number of quail per cage. So from what I understand you can have 3.5 per ft. At 2’x3’ that is 6 x3.5 that is 21. I would not put that many in a laying cage, but your cage should be able to hold 16 each. Would you agree with my math?
I am also thinking of using 1 cage for laying, one cage for breeding and 1 cage for grow out. Also wanted to get your thoughts on this configuration.
Thanks again!
I do agree with your math but I’ve always used the numbers as a guideline and give them more. I just feel like it gives them a healthier environment and less cleaning for me. That is why I put 5 females and 1 male in a 2’x3′ cage. As for a grow out, I have a 2’6′ double decker cage that I use for grow outs. I’ve never had more than 50 birds at a time in one and that was when they came out of the brooder at 3 weeks until they became 8 weeks old (maturity age) and then I would separate the males and females. Somehow the ratio was always about 50% so every body had plenty of room. Once I decided on who I would keep as breeders, I would move them into the 3 tier cage and harvest whoever was left. Worked out great. That’s what worked for me but I’m always up for experiments to see what works and what works best for each individual. I do know that do much space and can cause some to become territorial. Just keep an eye on them, watch for aggression, and they’ll let you know what they need. Best of luck!
For your 14-2”x2” and 5-1”x2” pine boards did you buy them in 8’ lengths?
Yes I did.